
Intel DP55KG Extreme Series Motherboard Overview....
Friday, 24 December 2010
Wednesday, 1 December 2010

By Mary Landesman
Getting a virus on your system is frustrating to say the least, and can be hazardous to the health of your computer. Indeed, today's malicious software can even steal your identity and wreck your hard-earned credit rating. To help fight back, here's a list of free tools, tips, and tricks to get rid of viruses and keep them from getting back on your system.
Free Virus Removal Tools
Sure the antivirus vendors want to make money, but if you ever get the chance to meet one of their virus researchers, you'll find their real motivation is to protect users. As corny as that may sound, it's true. That's why when stubborn or fast-spreading infecter are discovered, antivirus vendors release special tools to remove the malware - and give the tools away free. It's no substitute for installed antivirus software, but if you're already infected and in a pinch, it's the next best thing to, well, installed antivirus software.
- Create a free rescue CD - a rescue CD lets you access the system from a clean boot. A few vendors provide these free of charge and it takes only a few minutes to create one, so there's no excuse not to have one on hand.
- McAfee AVERT Stinger - McAfee AVERT Labs offers a handy utility to run in Windows that cleans some of the more common malware.
- Microsoft Malicious Software Removal Tool - Microsoft offers a free tool to remove prevalent software active on the system. The tool is offered via Automatic Updates, Windows Updates, and Microsoft Updates, or it can be manually downloaded using the provided link.
- Symantec Virus Removal Tools - Antivirus vendor Symantec offers a wide range of free cleaning tools for individual malware removal.
- F-Secure Virus Removal Tools - Another good choice for individual malware removal are these free tools from F-Secure.
- For a second opinion scan or a not-so-stubborn infector, try one of the Top Online Scanners
In next Posting I will inform you about "How to Protect your Email / Mail Box from Hacker's Attack".
Tuesday, 2 November 2010

A Complete Ebook of Top 100 Simplified Tips & Tricks of Photoshop Cs5 by Lynette Kent
About Author:
Lynette Kent (Huntington Beach, CA) studied art and French at Stanford University, where she received a Master�s degree. She taught at the high school and community college level before becoming an unconventional computer guru when she adopted the Mac in 1987. In her non-existent spare time, Lynette helps run the Adobe Technology Exchange of Southern California, a professional organization for photographers, graphic designers, and fine artists.
Photoshop is the core application for many different types of projects from graphic design to digital photography. You can perform many different types of tasks with Photoshop, and you can use multiple methods to complete each project.
Photoshop includes so many tools and panels that your screen can become cluttered, not leaving you sufficient room to work on an image. You may prefer to see only some panels and not others. You may also prefer certain tool settings to others. Customizing Photoshop�s menus and tools to work your way makes you more productive, the program more useful, and everything you do with Photoshop much more fun.
With Photoshop CS5, Adobe has improved the interface and given you new ways to customize
your settings. You can close some panels and open others to simplify your screen and keep only the tools you need available. You can make your own gradients, set up your own shortcuts, and design your own brushes. You can not only set up your workspace with only the panels and the tools you want for one project, you can also set up multiple workspaces, each with different tools for different projects, and switch between workspaces with one click.
These may seem like boring or simplistic steps, yet by learning to customize Photoshop, you gain familiarity with the program and become more efficient as you try different projects.
To download the complete Book, click the Download button below.
Sunday, 31 October 2010
Digital photography is a lot of fun. Because you can see your images as soon as you take the picture, anyone can take better pictures right from the start. You know immediately if you got the shot or not.
To get consistently better photos, it helps to get both you and your camera ready for taking pictures. Most people know that focusing the camera is important, but in many ways, it can be just as important to focus the photographer.
For getting consistently better photos, you must aware of the things about:
1. Select Good Photo Opportunities
2. It Starts with Four Letters
3. Master Your Camera to Get Great Photos
4. Choose the Image File Format to Suit Your Needs
5. Set the Image Resolution and Compression Level
6. Shoot Your Best from the Start
7. Pack for a Successful Shoot
8. Pick Good Light for Better Photos
and lots of other stuff to learn....
Download the complete Ebook of Top 100 Simplified Tips & Tricks of Digital Photography (4th Edition) 2010.
Click Download.
Panasonic Lumix DMC-FZ40
Along with the DMC-FZ100, Panasonic has also announced the Lumix DMC-FZ40 superzoom (FZ45 in Europe). Slotting in where the FZ38/35 left off, it features the same 25-600mm equiv. lens as the FZ100, but with a 14.1MP CCD sensor and simpler 230K dot 3.0 inch fixed LCD (as opposed to the FZ100's CMOS sensor and high-res screen). The FZ40 also offers AVCHD Lite 720p HD video recording, manual shooting modes and 'Sonic Speed' auto-focus system that the company says offers the industry's fastest focus times.
Saturday, 30 October 2010
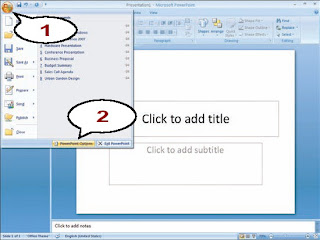
You can get more done and you can get it done faster with PowerPoint when you customize its options to suit your needs. The tasks in this post are geared toward making the PowerPoint user interface work for you by helping you to place the tools you need where you need them.
If you have ever wondered how to open presentations with the Outline tab showing or with the Notes Page hidden, find out how here. It only takes a few minutes to configure PowerPoint to open presentations in the view in which you are most comfortable.
If you are tired of browsing to file folders many levels deep to find or save files, you can save time by adding a shortcut to the Favorites links.
PowerPoint also offers a number of options that control slide shows, editing, printing, and AutoFormat, and you learn about those options in this post. I will describe all the Tips & Tricks in about 10 Continual Posts.
1. Customize PowerPoint Options to Suit Your Needs.
a. Changing the Dfault View of Your Presentation.
b. Add a Shortcut to the Favorite Links.
c. Customize the Quick Access Toolbar for Easier Command Access.
d. Customiz PowerPoint's Most Popular Options.
e. Customiz How PowerPoint Saves Your Presentations.
f. Modify the Display and Slide Show Options.
g. Change the Editing Settings.
h. Work with the Print Options.
i. Change the AutoFormat Settings.
a. Changing the default view of your presentation:-
You can view presentations in the format in which you are most comfortable when you change the default view in which presentations appear. For example, you may find that you routinely switch from the Slide tab to the Outline tab to see the organization of your presentation at a glance. On the other hand, you may find that you rarely use Notes,so you often turn off the Notes Page in order to concentrate on arranging your slides. If you routinely change the way you view presentations in PowerPoint, you can save time by specifying the default view you would like PowerPoint to use instead of making manual changes to the view each time you open a presentation. When you change the default view, PowerPoint displays only the parts of the screen that you want to see, such as the Outline or Slide tab, the Notes Page, or any combination of these options. After you specify the view you would like to use, you can see it take effect the next time you open a presentation.
1. Click the Office Button
2. Click PowerPoint Options

The PowerPoint Options Dialog box opens.
3. Click Advanced.
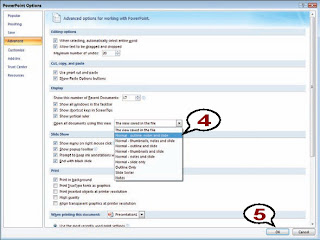
4. Click here and then select the view you want to use as the default.
5. Click OK.
The Options dialog box closes, and the next time a presentation is opened, the view is changed.
Tips
Did you know:- You can always can always change a presentation's view after you open it for example, to view or remove the Notes Page, click View, and then click Notes Page.
Try This:- If you spend a lot of time reviewing presentations, you may want to set the default view to open presentations to the Slide Sorter. To do this, perform Steps 1 to 4 above and then click the Slide Sorter option from the drop-down menu.
Customize it:- You can open presentation in the view in which the file was saved. To do this, perform Steps 1 to 4 above, and then use the drop-down list to click the option named The view saved in the file.
b. Customize PowerPoint Options to Suit Your Needs.
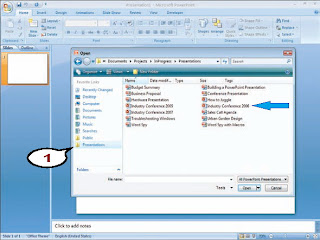
You can save time and access files quickly by adding a shortcut for commonly used folders to the Windows Vista Favorite Links list. The Favorite Links list appears on the Open and Save As dialog boxes and is most commonly used to access your Desktop, Documents, Computer, and Public folders.
Adding a shortcut to the Favorite Links list adds an icon to the list that represents a file folder, network location, or even a Web site. When you want to open a file from that location, you can simply click the shortcut to see the list of files that are available. Similarly, when you save a file, you can click the shortcut to save files directly to that location. You can also continue to browse folders even after you click the shortcut; shortcuts in the Favorite Links list are often used to quickly get to a hard drive or network drive and then locate the specific folder you want to use thereafter.
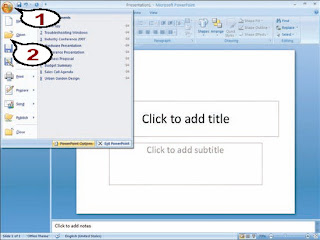
1. Click the Office button.
2. Click Open.
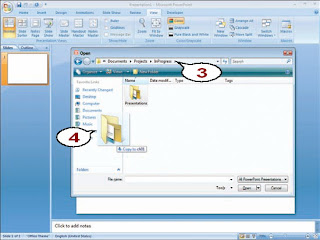
3. Open the folder that contains the subfolder you want to add as a shortcut.
4. Click and drag the folder and drop it inside the Favorite Links list.
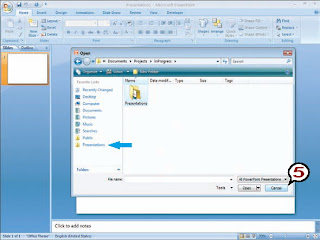
The shortcut appears in the Favorite Links list.
5. Click Cancel.
Use the Shortcut
1. In the Open or Save As dialog box, click the shortcut icon in the Favorite Links list.
The folder opens.
Tips
Did you know:- Because all of the Microsoft Office 2007 programs use the Windows Vista Open and Save As dialog boxes, a shortcut you add to the Favorite Links list in PowerPoint is also accessible in other programs like Microsoft Word and Microsoft Excel.
Try This:- To create network shortcuts, display the Open or Save As dialog box, click Folders, click Network, and then double-click a computer to see its shared folders. You can then click and drag a shared folder to the Favorite Links list.
Cross-Platform:- In Windows Xp, add shortcuts to the My Places Bar, instead. In the Open or Save As dialog box, open the folder, click Tools, and then click Add to "My Places." The shortcut appears in the My Places Bar on the left side of left side of the dialog box.
c. Customize the Quick Access toolbar for Easier Command Access.
You can make your life easier and more efficient and you can get the most of the Quick Access toolbar by populating it with the commands that you use most often. The Quick Access toolbar appears to the right of the Office button the upper left corner of PowerPoint. By default, this toolbar offers buttons for three most frequently used commands: Save, Undo, and Repeat or Redo. If there are commands on the Ribbon that you use frequently, you can access them even easier by placing them on the Quick Access toolbar. You can add any PowerPoint command to the Quick Access toolbar.
Note that you are not restricted to just a few commands. If you place the Quick Access toolbar below the Ribbon, you can use the full width of the window, plus you get a More Control button at the end of the toolbar that enables you to display another whole row of commands.
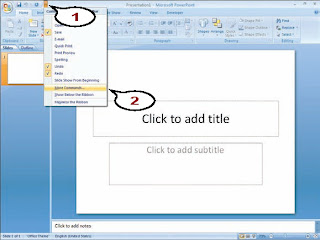
1. Click the Customize Quick Access Toolbar button.
2. Click More Commands.
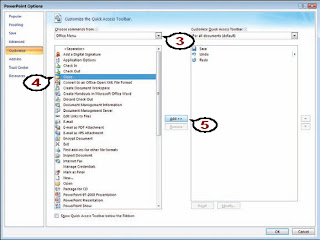
The PowerPoint Options dialog box appears, with the Customization page displayed.
3. Click here and select a category that holds the command button t add to the toolbar.
4. Click the command to add.
5. Click Add.
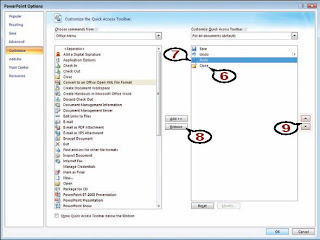
6. The command appears on the list of commands currently available on the Quick Access toolbar.
7. Click a command to delete, move up, or move down in the list of commands currently on the toolbar.
8. Click Remove to remove it from the toolbar.
9. Click the Move Up or Move Down button to change a command's position.
Click OK.
You will see your added commands to the right side on the Quick Access toolbar.
Tips
Try This:- To move the Quick Access toolbar below the Ribbon, click the Customize Quick Access Toolbar button and then click Show Below the Ribbon. PowerPoint moves the toolbar under the Ribbon, which gives you more room to add commands.
More Options:- There is an easier way to add some commands to the Quick Access toolbar. Either pull down the Office menu or display the Ribbon tab that contains the command you want to add. Right-click the command and then click Add to Quick Access Toolbar.
Remove It:- To revert the Quick Access toolbar to its default state, click the Customize Quick Access Toolbar button, and then click More Commands. Click the Reset button and then click Yes the Reset Customizations dialog box the appears. Click OK to return to PowerPoint.
To Download the Complete PDF Book of PowerPoint 2007 Top 100 Simplified Tips by Paul McFedries, Plese Click the below button.

Thursday, 28 October 2010


"Top Ten SECRETS of Windows 7" a magazine of PC Magazine (2010-2011), must see it. The "Top of the Chart" magazine.
Inside the Magazine:
7 Deadly Twitter Sins
Google�s Self-Driving Car
New Danger
In Online
Gaming
TV Watching Just
Got A Lot Better
Top-notch,
3D-ready
Plasma
Terrific
HD Video
To Go
A Familiar,
Powerful
Phone
High-Def
Webcam
A Sleek, Powerful Laptop
A Novice Gamer�s Dream Box
A Fully Loaded,
Pricey Biz Laptop
Small PC,
Hefty Price
A Pen That Digitizes
and Records
A Superb Suite
for Mac Users, Finally
& Much more....
Download it NOW for Free with "PC Magazine Oct 2010"
Dentist Budapest


