PC Supporter: We are writing reviews & overviews about latest Technology, Gadgets, Social-networks, HP Printers, Operating Sys, PC Games & Wallpapers

Tuesday 25 December 2012

Untag Facebook Photos and Share Your Year in Review


Facebook is a well-known Social place, and the users definitely know the basic usage of it, like how to update your status or upload a picture or video etc.


But still there are users who don't like to change anything inside "Account Settings" or "Privacy Settings", just because they worrying about that change or because they don't have time or knowledge to do, likely to say those people doesn�t actually gave much importance to their Facebook account. Possibly or certainly a time comes those users should take note of that mistake they are doing. Mistake is when you don't know �What you share and with whom you share?�


So you should go and checkout the Facebook Data Policy if you aren�t a bit silly Facebook user.


The instruction below is for the users who are tagged in many photos inside Facebook Pages or tagged by some of their friends and now they want to be untagged from all those photos at once.


We aren�t describing all the Privacy or Account settings inside this post, we only shows you how to make your "Year in Review" shareable with your Friends and Family and how to get rid of those tagged �Photos of You� or �Photos posted by others� you don�t like to be there.


1. Log in to Facebook Account, and click on �Settings� button in right upper corner, and click on �Privacy Settings�. (on the left sidebar make sure you are on the Privacy tab).


2. Inside �Who can see my stuff� category of settings, there is some text showing �Review all your posts and things you�re tagged in�, and click on �Use Activity Log� infront of that text.


Facebook_Activity_Log_Right_Sidebar
Right Sidebar -"Photos of You"

3. Now you can see �Activity Log� page where you can see your activities, like your posts, Posts you�re tagged in, Posts by others, Posts you�ve hidden etc.


4. On the left sidebar click on �Photos�, this will shows all the Photos recently showing on your timeline, Photos uploaded by you and also Photos you are tagged in, but you just need to click on �Photos of You�, because those photos uploaded by others and you just tagged in.


5. Now you can select each Photo by click on the selection box infront of each one and click on Report/Remove Tag button on the top to Un-tag yourself from Photos or Videos you don't like.


Make sure you can Un-tag 10 Photos or Videos at a time, and those photo or videos will no longer be shown on your timeline as well as those photos will not be shown in your �Year in Review� (a new feature available for every account on Facebook), and you can ready your Year in Review to be shared with your Friends or Family.


If you get something helpful from this post, please share with others. And your precious wordings will definitely be appreciated. 


If you want to Turn On Tag Reviews read here "Turn On Tag Reviews On Facebook To Avoid Being Tagged Automatically"



Thursday 6 December 2012

How to Set Up a Homegroup in Windows 7


Sharing Files, Media and Folders on any Network now a days isn't a big deal for many of Windows 7 users, but some users still find it hard to connect to Home Network to Share files with other Computers.


Definitely you can get you Answer on Google or else where very easily within a few minutes to how to get create and connect to Home Network, but while you searching and you are not a regular or pro user you will   find some articles which are written for Pro users, and you will find this hard to follow and get connected.


Here we are going to share Mr. Mike Halsey (www.thelongclimb.com) article, who is describing the connectivity to HomeGroup Network really simply, and hope after reading this you will be able to connect your Computer to other computers situated at your Home or Office.


Before going to the process lets read a quick tip.


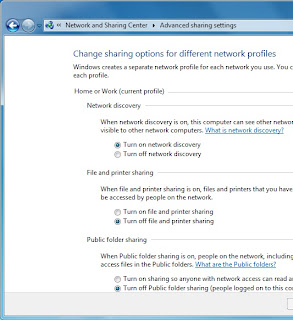
Manage advanced network sharing Settings
Start and type Manage advanced sharing Settings press Enter

If you want to share documents, photos, videos and music within your home use the Network Sharing Center to check your security settings are set right. The security options are clear and easy to understand with plain English throughout. To checkout your Network Sharing options click Start and type Manage advanced sharing Settings then press Enter, and make sure your settings are same like the image below.


You can share your internet connection, Printer(s) and files. The settings here allow you to set what's shared and who can see it.


You can also share folders by Right Clicking on one or more in Windows Explorer and selecting Share with in the context menu that appears.


You can choose from users on your PC and network who the folder is shared with,   or you can share a folder with your Homegroup.


Setting up a Homegroup.


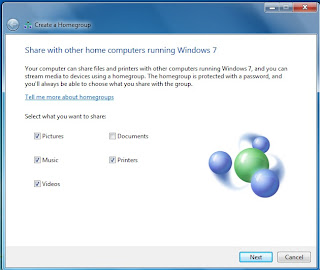
Homegroups are new to Windows 7 and they're an excellent way to share Music, Pictures, Media files and also Printers with other PCs running Windows 7 on your home network. To create a Homegroup open Network and Internet from the Control Panel and then click on Create a Homegroup.


Alternately you can type Homegroup in Search box in Start Menu. The picture showing what kind of files and stuff you want to share with other computers, after choosing one or all, click Next.


Your Homegroup is now automatically created and  you will be given a password to type in computers you want to connect with this Homegroup network.


After creating a Homegroup network, remember this is your Host PC, and you can change any setting anytime by typing Homegroup in Search bar inside Start Menu.


How to Connect to Homegroup


Now its time to connect other computers to this Homegroup network, same way, open Homegroup by the way described above, The system will show all available Homegroups (remember the host PC must be switched ON). You will be asked for the password and then what files and documents you want to share from the new PC.


In Windows 7 Homegroup an additional and useful feature is the ability to stream media to other PCs and devices. This means music and video content can start playing on the other devices without being copied across to that device. It plays on the PC it's sat on and can be seen and heard on the other.


If you are using Wi-Fi - This is how you can make better your Streaming Video or Music:


If you use a Wi-Fi network in your home and want to stream and share video consider upgrading your Wi-Fi routher from the 802.11b or 802.11g to 802.11n standard. These codes are clearly labelled on products either at online stores on in the shops. Wireless N offers much greater bandwidth than previous standards. This means that video can be sent to other PCs on your network without any worries about it stuttering during playback.