PC Supporter: We are writing reviews & overviews about latest Technology, Gadgets, Social-networks, HP Printers, Operating Sys, PC Games & Wallpapers

Wednesday, 1 May 2013

Now Share Photos to Instagram from your PC


Post or Upload your best Photos to Instagram directly from your Local Hard drive on PC, no need of a smartphone, never mind if those Pictures are taken by a Digital Camera.


About Instagram by Instagram, "Instagram is a fun and quirky way to share your life with friends through a series of pictures. Snap a photo with your mobile phone, then choose a filter to transform the image into a memory to keep around forever. We're building Instagram to allow you to experience moments in your friends' lives through pictures as they happen. We imagine a world more connected through photos."


Never mind if you don't have a smartphone to install Instagram app on it, and capture photos and then upload the best ones to Instagram and share with your friends. Now you can upload every Photo of your choice from your Local Hard Drive on your PC, without having any problem nor breaking Terms & Laws of  the Service.


All you need a PC having photos you want to share on Instagram. By following my steps, first thing first, WE ARE GOING TO INSTALL ANDROID APP PLAYER ON YOUR PC to enable to download and install Instagram, and have a fun. If you agree, follow me.


I don't know very much about Android app players, but I will suggest you the one I tried and currently in use on my PC.


First you can see my Profile on Instagram, I upload all these photos from my PC using Android App Player called BlueStacks App Player  (http://www.instagram.com/shafky).

Here is a short introduction about BlueStacks App Player, "BlueStacks App Player lets you run apps from your phone fast and full screen on Windows and Mac".


Time to go ahead, Download and Install BlueStacks App Player on your PC, (available for both PC & Mac), but I only can guide PC users, as I am a PC user.


You should use Instagram App before, or you should know about Android platform to how to download apps from Google Play Store, so I will go further, but if you still having problem against BlueStacks Apps Player installation, you can ask BlueStacks App Player help forum here (https://getsatisfaction.com/bstk).


You need a Google account to connect and sync with Google Play Store. Another thing you should know about BlueStacks App Player that some people having problem with their current location (IP Location) on BlueStacks App Player. If BlueStacks App Player couldn't locate your Local IP Location, don't worry "You still can upload photos of your choice", as this problem is still unsolved from BlueStacks App Player help forum, I also have the same problem and I also contact BlueStacks App Player, but anyhow I can still upload Photos to my Instagram account (but I can't add these photos to Photo Map because my location is not readable by BlueStacks App Player, I don't care, I only need to upload pictures to my Instagram, and that's all).
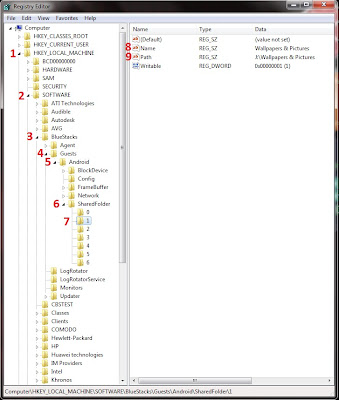

1. After successfully downloading and installing both BlueStacks App Player on your PC and Instagram app on App Player, you almost done but time to change some Registry keys so your App Player can find your photos on your local hard drive from your PC.


2. I'm using Windows 7. Go to "Start" and search for "regedit" and press Enter.


3. Registry Editor will open, now inside registry editor go to "HKEY-LOCAL_MACHINE > SOFTWARE > BlueStacks > Guests > SharedFolder > 1", 


4. Right click > Modify... the "Name" string value. Change value data to folder name you want to add to your App player, for example mine is "Wallpapers & Pictures".


5. Again Right click > Modify... the "Path" string value. This time change value data to path of that specific folder, for example mine is "J:\Wallpapers & Pictures".


Same way you can attach more then one folder to BlueStacks App Player by changing the string values of folders named 2 and 3 and 4 etc, inside registry editor (HKEY-LOCAL_MACHINE > SOFTWARE > BlueStacks > Guests > SharedFolder)


You almost done here, but a last step is...


6. Additionally, you must need an app to reach to the specific folder you attach to your BlueStacks App Player, for this reason I am using "ES File Explorer" you can download it from Google Play Store using BlueStacks App Player and install it.


7. Now open ES File Explorer, go to SD Card and find the folder "bstfolder", open it, inside you will find same folder that we recently attached to BlueStacks App Player (Wallpapers & Pictures), open it and find all your photos inside.


All done, now open Instagram app on your BlueStacks App Player, Log in and upload (or even you can capture photos via your webcam) photos by clicking the gallery button (on right side with camera button in the middle), it will ask you from where to upload a picture, select ES File Explorer > SD Card > bstfolder > Wallpapers & Pictures > and choose a picture you want to upload to your Instagram app.


The technique isn't very complicated nor simple but for me its very important to run Instagram app and upload pictures everytime, as recently I don't have my smartphone.


Hope you will find this article supportive if you can't live without Instagram.


Note: When you open Instagram app on BlueStaks App Player, if you cannot see the middle camera button and other buttons, Go to Setting > Change App Size > and click Default size for Instagram on BlueStacks App Player, as BlueStacks app player support both Tablet & default app sizes.





Wednesday, 17 April 2013

Tablet PC Guide - PC Supporter


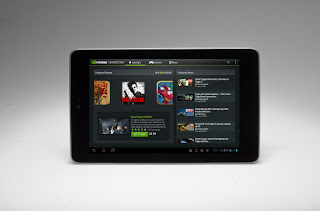
2013 is the age of Modern technology - Touch Screen computing & Smart gadgets - The Tablet PC Guide 2013.


It's clear now that tablet PCs are no fad. Beginning with the launch of the high-price, low-powered iPad 1 in April 2010 and culminating with the release of the low-price, high-powered Nexus 7 in July 2012, tablets have gone from being a niche, luxury-only computing peripheral to the latest must-have accessory.


To keep up with technology in 2013, you either have a tablet or you're buying one soon.


However, the fast pace of the tablet world means you can be forgiven for struggling to keep up with the changes to software, hardware, pricing and manufacturing. Sometimes it seems like there's a new tablet every other week, each better and more desirable than the last. Rather than leave you to fend for yourself, we've put together this six-page guide to tablets in 2013 - those that are on Shelves now, those that are being released soon, what you might want to look for if you're buying a tablet and what, if anything, you should avoid.


Here we are describing some features you must know if you are going to purchase a Tablet device.


What Screen Do I Want?


Tablet screens range in size from tech near pocket-sized 5" versions to a comparatively colossal 12 inches on the largest devices, but it is much more typical for screens to be between seven and 10.1 inches in size. Note that this is a diagonal measurement, so a 7" screen is actually has almost half of the visual real estate of a 10" screen (hence the moniker 'mini-tablet' to refer to devices in the 7" to 8" device class.)


While it's tempting to assume that 10" screens automatically better for being larger, there are benefits to 7" devices. Not only are they more portable (it's possible to comfortably hold them in one hand - something that may appeal to those planning to use a tablet as an e-reader), but they're often able to make better use of their technical capabilities, because they're managing fewer graphical resources.


Rather than the screen size, though, pay attention to the resolution. At a minimum, any device you consider buying in 2013 should have a resolution of at least 1024x768 (or similar), but the higher the resolution, the sharper text and images will be - especially when zoomed in. Apple�s Retina display remains the gold standard for tablets, offering a resolution of 2048x1536 on the iPad third- and fourth-generation�s 9.7� screen. The likes of the Nexus 7 and Kindle Fire HD are better-performing in the 7� device class, however, with their 1280x800 resolution easily trumping the iPad Mini�s 1024x768.


How Much Storage Is Appropriate?

Storage is one of the most widely varying factors in the tablet market. Tablets use solid-state drives, which are compact, quiet, shock-resistant and less power-hungry than hard drives. That said, the expense of SSD memory means that tablets therefore have much less space than modern laptops and desktops - typically between 4GB and 64GB.

The amount of built-in storage cannot be changed or upgraded, although many tablets do have slots for memory cards (usually micro-SD), which can be used to add removable storage. Some notable exceptions to this rule are Apple�s iPad range, no model of which has any provision for removable storage, the Kindle Fire, Kindle Fire HD and the Nexus 7, which will only support SD cards and USB flash drives after a combination of software modifications and additional hardware purchases.

The lack of expandable space on such popular devices is something of a contrivance designed to push consumers towards the more expensive, higher-capacity devices. However, the relatively small amounts of storage on modern tablets, combined with their ubiquitous internet connections, has led to an increase in the popularity of cloud storage systems. Apps such as DropBox and SkyDrive allow tablet users to utilise the internet for storage of data, minimizing the trouble associated with a lack of space.

Nonetheless, cloud storage is far from a perfect replacement, and even SD cards can prove fiddly. We�d suggest buying a device with at least 16GB if a model is available. That should be enough to last you the two to three years of the tablet�s life without becoming inadequate.


Does The Processor Matter?


When looking for a tablet, you can expect a number of other components as standard, but some vary from model to model or between manufacturers. The amount of memory and storage space often differs wildly, as does support for external devices and flash memory. Portability factors such as battery life, weight and screen size should also be considered. However, as with desktops and notebooks, the processor is perhaps the chief indicator of how a tablet PC will perform. The most popular tablets run on ARM-based Cortex chips, but a minority run on Intel chips, and there�s even variation within both brands.

Unlike Intel, which develops and manufactures its own processors, ARM Holdings only designs the chips, then licenses the designs for other companies to produce, meaning that there are often multiple variations of single architectures. The most popular chip at the moment is the Cortex-A9, which is the basis for the Apple A5 & A5X chips (used in the iPad 2 and iPad 3), the Nvidia Tegra 2 and 3 (used in the Google Nexus 7 and Microsoft Surface), and the TI OMAP 4 (used in the Kindle Fire and Kindle Fire HD).

While it�s fair to say that devices based on the same chipset have comparable performance to one another, the actual speeds experienced by the user will of course depend on the hardware and software resources available - in particular, the amount of RAM or model of GPU. It is, however, fair to say that the A9 devices are better than the A8 devices, and that the next ARM model (the Cortex-A15) will similarly outclass them both when manufacturers are ready to introduce it later this year.


Although ARM processors undoubtedly have the edge, there are a number of tablets running on Intel hardware, and it�s usually Intel, since unlike the desktop market, AMD does not have a major foothold producing Intel-compatible chips for tablets. Intel�s low-power and portable chips allow tablet PCs to run Windows 7 and 8, although at speeds closer to netbooks than laptops. More powerful tablets may contain full-size Core i5 processors, of the kind found in desktops and powerful notebooks. The increased performance capacity makes for a better Windows experience, but they are less compact and consume more power than mobile chips, meaning a worse battery life and a larger, less portable form factor.

For Windows users here are 6 features your Windows Tablet PC must have, before you go and select one to purchase.


Tuesday, 16 April 2013

Control Your PC from a Mobile Device - PC Monitor


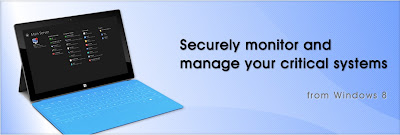
Monitor a Laptop or Desktop PC from a Mobile Device


All it takes to get started is a smartphone or tablet, a data plan, the right app, and a few PCs in need of some love and attention.


by Marco Chiappetta - originally published at PC World Magazine 


If you are still wasting time trudging over to PCs to perform routine maintenance on them, check for software updates, and power them down at night, you haven't gotten with the program. Here's how to check on your PCs from anywhere, and save your business both time and money.


Get started: A number of remote PC management utilities are available, but we'll focus on an excellent tool called PC Monitor (www.mobilepcmonitor.com), which is free for three PCs. It works with Android, iOS, and Windows Phone OSs, as well as with Windows, Mac OS X, or Linux.


Install PC Monitor: Installing and configuring PC Monitor requires just a few steps, and the default setup options should be sufficient. Install the appropriate application on each system that you want to monitor.


The first time you launch the PC Monitor Manager, it will prompt you to create an account for connecting your PCs to your mobile devices (or for monitoring the systems via the Web). At your first login, enter a computer name and a group name for the system.


Customize your counters: To configure a custom monitor or counter (for CPU use, say), click the System tab, and work your way through the tabs in the pane: General, Services, Network, and so on. The Schedule Tasks tab lets you enable the monitor simply by ticking a task. Under the Performance Counters tab in the System pane, you can set up custom counters based on criteria that you specify.


Set up notification alerts: To get the most from PC Monitor and to have it notify you the moment something critical occurs, click the program's Notifications tab, and then click through the tabs in the resulting Notifications pane, enabling appropriate alerts as you go. These alerts may include when the computer starts up or shuts down, when particular users sign on, when someone plugs in a removable drive, or when a processor begins to overheat. More advanced notification options may require you to set up rules manually.


PC Monitor (Image Courtesy PC Monitor)


Grab the PC Monitor mobile app: After installing the PC Monitor app on the relevant PCs, you must install and configure the companion mobile app on your mobile devices.


Select a PC: Upon signing in to PC Monitor, you should see a list of your systems. Tap a system name in the list to bring up an overview of the system.


Monitor your PC from your couch: If you've enabled notifications already, all that remains is to explore the mobile app for monitoring and managing your systems. PC Monitor will send alerts if necessary, but the mobile app also provides real-time data.


After you tap a system name in the left pane of the app, the right pane will become populated with system details and buttons for performing various tasks, including such options as opening a command prompt, checking for OS updates, and restarting the monitored system. In addition, you can use the PC Monitor mobile app to send messages back to the associated desktop PC, if you want to alert the PC's user.


After the application is installed on a system, the PC Monitor service runs in the background. During our testing, the service rarely, if ever, consumed a detectable amount of CPU time, and it used no more than 44MB of RAM.


Monday, 15 April 2013

15 Google Calendar Tricks by PC Supporter


Power Through Your Schedule with 15 Google Calendar Tricks.


Whether you are a Calendar novice or a longtime user, these tips will give you even greater control and productivity.


This article was originally published in PC Magazine's monthly edition, and reason to publish it again on PC Supporter is only to share tricks of Google Calendar with our readers.


By Elsa Wenzel - PC World Magazine


This guide will help you take control of Google Calendar, whether you are a novice or a power user. Most of the tips apply both to the free Google Calendar and to the one that comes bundled with a paid Google Apps for Business subscription.


Work Faster -- and Focus


1. Use keyboard shortcuts: Google offers many keyboard shortcuts that can save your time. Most are pretty intuitive, for starters, press the letter C on the keyboard to create an event.


2. Find any date in a hurry: Visit the Labs via the gear icon. In the list that appears, enable Jump to date, and then click Save. Now the 'Jump to date' tool will appear to the right of your calendar, and you can punch in any day to do just that.


3. Customize calendar navigation: Go to the mini calendar to the left of the main calendar, and highlight the time frame you wish to see. Your main calendar will instantly adjust. To count your days in increments of, say, three weeks, click the gear icon on your calendar page, and in the General settings change 'Default view' and 'Custom view' to 3 Weeks. Once you save, you'll see 21 days at a time whenever you open your calendar.


4. Oversee your agenda: If you are a power user with lots of shared calendars and appointments, the Day view can be hard on the eyes. To bring up a plain-text list of events for the day ahead, click the Agenda button above your calendar.


5. Dim less-important events: To make pas and repeating future events look a little less vivid, click the gear icon, and on the Calendar Settings page find 'Even dimming'. Check Dim past events or Dim recurring future events (or both).


6. Hide weekends: To show just Monday through Friday, click the gear icon and select Hide weekends in the General settings.


7. Minimize all-day events: If out-of-office entries are clogging your calendar, click the tiny triangular arrow that appears below and to the left of the first day of the week. You'll see a synopsis such as '19 events' at the top, instead of a pile of text.


8. Keep work and play at your fingertips: to set up toggling between home and work calendars, click your email address in the upper-right corner of the Google Calendar page, and select Add account. Enter the details for your private Gmail address. When you click your email address in the corner, you'll see both accounts, and you can toggle between the two calendars.


Google Calendar - Make Scheduling Smarter


Make Scheduling Smarter


9. Schedule and even in one line: You can add an event in one line of text, without using the full Create Event form. Start by clicking anywhere in your calendar; then fill out the text field. By default, any event lasts an hour if you name a start time without an end time, and it lasts all day if you don't list a time at all.


10. See when a colleague is available: Expand the Other Calendars drop-down menu to the left of your calendar to see a list of your third-party calendars. If your company uses Google Apps for Business, start typing someone's email address, and Google will autofil the rest. Select an email address or spell it out to see that person's color-coded appointments.


11. Check whether everyone can meet: Click the gear icon to visit the Labs. Scroll down, select Enable for the Smart Re-scheduler, and click Save. In the calendar, select a meeting. In the Smart Re-scheduler module, click Find a new time. Google will load and display the team's calendars. If your company uses Google Apps for Business, you will also see suggestions for available rooms in the building.


12. Hide events you're not attending: Click the gear icon, and in the General tab of Calendar settings, uncheck Show events you have declined. Under 'Automatically add invitations to my calendar', you can choose not to see those events unless you've accepted the invitation.


13. Let Google Calendar RSVP for you: Click the gear icon, enable Automatically decline events, and save. People who invite you to events at times when you're already booked will get an instant reply.


14. Don't miss the next meeting: Blare a reminder to yourself about your next meeting by adding a module to your calendar. To do so, visit Labs from the gear menu and click Enable for 'Next Meeting'.


15. See who's free or busy: In the gear drop-down menu, choose Labs to enable the 'Free or busy' add-on. Type a colleague's email address there to get an always-on 'free' or 'busy' status message.